- You are here:
- Home »
- Blog »
- Social Media »
- How To Use Instagram For Business: Getting Started
How To Use Instagram For Business: Getting Started
Instagram For Business: Getting Started
This guide was created for you if you want to learn how to use Instagram for business but are struggling to get started or have no clue what you should be doing.
Who Is This Guide For?
This is for entrepreneurs, business owners, or marketers who are not yet using Instagram for their business to get new customers and build their brand.
Who This Guide Is Not For
This is not for experienced marketers or businesses who are active and successfully using Instagram.
Why Use Instagram For Business?

*Instagram Stats as of 8/9/15
With 300 million active users, there is certainly opportunity for you to take advantage of using Instagram for your business.
With 70 million photos shared everyday, you need to be smart about your efforts so that you will be able to take advantage of the channel and not get lost in the noise.
Like anything, Instagram is only as good a tool as you use it for. It can be great if you have a solid plan, execute your plan, and make adjustments to constantly improve.
If you have a plan but don’t execute, then don’t expect it to be very helpful.
And if you are just posting but don’t have a real plan, you can see some impact, but it won’t be as great (especially long term) as if you are working strategically.
Here are the areas of Instagram we’ll talk about here to help you get started:
- Optimizing your profile (profile photo, bio text, link)
- How to take pics for Instagram
- How to edit pics with Instagram (filters, custom)
- How to create text-based graphics
- Call to action posts
- Posting syntax (location, caption, emojis, tags, hashtags, hashtags as comments, tagging in the pic)
- Getting followers
- Get Started With Your Business Instagram Marketing
- Free Guide “How To Use Instagram For Business”
How To Use Instagram For Business
Create Your Instagram Marketing Plan First
 First things first. Yes, you could just sign up for your account, add a random profile picture from something you have on your phone, and start poking around, follow some Facebook Friends that Instagram highlighted for you to follow, and post a picture once in a while when you see something that you think is cool.
But let’s face it, that’s not how to get Instagram working for your business.
It’s important to have your plan set up and executing when you start to grow your audience.
Why?
That way when people come to your profile, they’re convinced to follow you. And if you have a solid profile, they will take even further action (like, comment, tag a friend, visit your website, subscribe, share your site with friends).
This will come into play later, but it will emphasize the importance of thinking beyond the effect a post will have just at the time of publishing. Someone new to your profile will be looking through at your previous posts and so those posts can still have some impact for your business. We’ll talk more about this in the Call To Action posts section.
Setting Up Your Profile For Success
When you’re getting started, you need to get your profile set up so that when people check you out, they are convinced that you’re worth following.
How can you do this? With your profile picture, your bio, your link, and what you post.
Your Profile Picture
When it comes to your profile picture, you basically have two options:
- A picture of yourself
- Your logo
If you’re a solopreneur or are using Instagram as an individual for business purposes (perhaps you’re the founder), then I would strongly suggest using a picture of yourself. When people see another person, there’s eye contact and a nice smile, which will resonate a little more than just a logo.
If you’re using Instagram as a company or brand, then you can use your logo as your profile.
Your Bio
When people click to see your profile, they take a split second look at your profile picture (because on Instagram it’s just a tiny thumbnail and can’t be clicked for a bigger view), then they read your bio to see what you’re all about and if you’re someone they’d be interested in following.
So how can you make your bio convincing enough to strangers that they would want to hit that follow button?
This is where you can leverage your Unique Value Proposition (or even write a specific UVP just for your Instagram account).
This will communicate the message about what kind of pictures and content you’ll be publishing and who it is for. Then when your target audience reads your bio, they know it’s meant for them and what benefits they’ll get by following you.
Should You Use Emojis In Your Bio?
Emojis run rampant on Instagram. In the captions. In the comments. But are they right for your bio?
Only you have that answer. What’s your brand’s tone and voice? What about your customers? Do they use emojis?
Does it make sense for you to use an emoji?
Adding A Call To Action To Your Bio
If you really want to drive new followers back to your website, then you’ll need to go beyond just a UVP that will make them want to follow you.
You already have their attention and can give them a low-threshold offer (low/no-cost offering, usually in exchange for an email address). Something so enticing that they’ll want to click over from your profile to your website and sign up right now.
Your Link
Most people just put a link to their home page here and don’t think twice about it. But is that really the best option?
For any real marketing campaign, you need to have a dedicated landing page.
If your home page has a hero section with a headline, UVP, and opt-in right at the top, then you can get away with driving traffic there. If not, then I would suggest creating a dedicated page on your site to drive Instagrammers to and welcome them to your site.
Getting More Out Of Your Link
If you want to use Instagram as a way to drive Followers to your email list (and you should), then you should definitely add in a specific Call To Action to your bio and create a dedicated landing page.
This can either welcome them to your site from Instagram or can be a lead generation page with a special offer that you describe in your Bio.
How To Take Quality Pictures
Obviously you want to be taking quality pictures. You don’t need to be a professional photographer to just check off the basics before you click the shutter button (for you youngins, that’s the button on top of a camera that you push to take a picture on a camera that doesn’t have a touch screen).
It’s important to note that Instagram pictures are square. On an iPhone, you can change the size of the photo your taking. While you have the camera open, look towards the bottom of the screen and swipe your setting from Photo to Square. Otherwise Instagram will crop your photo when you go to upload it.
Composition
Fill the composition of the shot appropriately. You don’t want too much background (or foreground) distracting from the main subject of your picture.
Lighting
Make sure your scene is well lit. A naturally lit photograph will look much better than if you are using the flash from your iPhone. If you’re going to be taking a lot of photos daily of your products or workspace, then you might want to invest a few bucks in a DIY lighting kit like this one that Wistia recommends for less than $100.
Focus
Ensure that the main subject of your photograph is in focus. If you tap the screen on your iPhone while the camera app is open, it will focus where you touch. So look at the main subject of your photograph on your screen and tap to focus in on where you want the focal point of the shot.
How To Edit Your Pictures
The Preset Filters
The preset filters are pretty straight forward, you pick one and it adjusts your photo accordingly. Those are good for some photos and if you’re in a rush. But if you want your pictures to look more high quality versus artsy, then you should probably go with your own custom editing.
Custom Editing
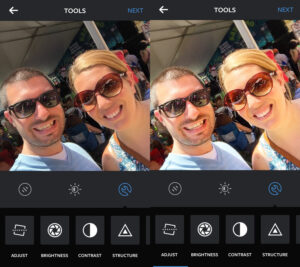
Some quick editing with the custom Instagram settings brightened up this picture of my wife and I visiting New Orleans without making it look like we were in Williamsburg #hipsterjoke
If you’re taking photos that you want to look high quality and not artsy, then custom editing is the way to go.
There are no specific instructions that you can get for custom editing because every photo is different. So take some time to play around with all the options. They are simple sliders to increase/decrease the effect. You’ll get used to them pretty quickly and see which options do what.
A good thing to aim for is using the brightness/highlights to do a makeshift white balance on your photos. Look at the whitest thing in your picture, and adjust the brightness/highlights until it’s as close to white as you can get. If the picture has balanced lighting, then it should look pretty good at that point. If it’s completely blown out, slowly lower the brightness/highlights until the photo looks normal again and leave it there.
The most common adjustments (usually increasing) that I make to my photos include:
- Brightness
- Contrast
- Structure
- Warmth
- Saturation
- Highlights
- Shadows (to lighten up the darker spots)
- Back to Contrast (to sharpen the darker areas to where they should be)
- Tilt Shift
- Sharpen
A simple photo editing tip I learned when I was designing at Universal Records was to increase a setting way too much, then slowly lower it until it looks good. Most of the time it will be a significant adjustment but one that looks good and makes a positive difference rather than too blown out or not enhanced enough.
How To Easily Create Text-Based Graphics
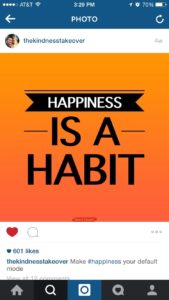
This 4 word graphic got over 600 Likes on Instagram. So don’t feel the need to only post photos, your audience might be more interested in some nice looking text.
*Created with WordDream app
If you’re new to Instagram marketing, you may be wondering why you’d post a text graphic to the photo sharing network?
It’s become more and more common as Instagram has become part of people’s daily interactions to actually create text graphics to communicate your message since the platform only allows you to post photos and not just text.
Using text-based graphics on Instagram can be very beneficial for increasing engagement and helping increase your brand reach.
Many Instagram power-users create text graphics with popular quotes, tips for their followers, or most importantly, Calls To Action. Want more people to find your page? Then post a “Tag A Friend Who ___” photo and watch the comments and tags start coming in! Once you have built your initial audience of course 🙂
Quotes
What kind of quotes should you post?
First, you want to make sure that everything you post, pictures and text graphics included, is relevant to what you offer your audience and what your audience is interested in. If you are a construction company, you don’t want to post a quote from Ghandi (unless of course that aligns with your brand mission and is part of your overall strategy).
But what about a quote from the pioneers who built America? That’s something relevant to what you do and to why your audience follows you (pics, info, content about construction).
Think about the pioneers and thought leaders of your industry and make a list of quotes that you can pull when you want to fill in your editorial calendar with some text graphics.
You can also use a photo of the person that you’re quoting as the background and fade it out so the text is legible to add a little more depth to your image.
Tips/Teasers
Is providing educational content to your audience part of your strategy? Then posting short tips followed by more info in the caption is a great way to do this from your Instagram account without being limited to finding/taking a photo that somehow communicates what can be said in 6 words.
I know a picture is worth a thousand words, but if you want to say something concise, sometimes 6 words is better than a thousand 🙂
Have a new blog post that you want to promote? Then making the headline into a graphic and posting it to Instagram will help get the word out. When doing this, it might be worth updating your bio link so you can say, “visit the link in my bio for more.” Instagram doesn’t make links clickable in a photo caption, so you need to utilize what you have access to (like the bio link).
If you will be promoting a lot of blog posts this way, then you might want to think about making your Link go directly to your blog archive so you don’t need to continuously update your link every time you have a new blog post.
Call To Action Posts
Want to drive more action from your followers?
Want to increase your brand reach by leveraging your now loyal audience?
Call To Action posts are how you can make things happen. While you should put some kind of CTA in most/all of your posts, a CTA post is focused on one thing: action.
It’s important to note that seeing success with a CTA post comes after building your initial loyal audience and earning equity in your relationship with them so that they’ll want to take action on your instructions.
What kinds of Calls To Action should you use on Instagram?
Your CTAs depend on your goals for the post, so let’s break down a few popular practices:
Goal: Get more Instagram followers
CTA: Tag a friend who ____
Create a graphic that asks your followers to tag a friend who .
Follow through in your caption to tag a friend followed by why and give some value so that when the friend sees the post notification, they are going to want to follow your account.
Goal: Drive people to your new blog post or landing page
CTA: Headline or benefit of your new blog post
Without diving too much into copywriting and headline practices, you need to write something that’s intriguing and informative enough to drive your reader to click through to your website.
A great tip I learned from Joanna Wiebe of Copy Hackers fame, is to write your Call To Action as the end of the phrase “Don’t you want to…”
Let’s say that you’re a bicycle shop and the new landing page is for an offer that people can get a discount on new tires that will help them ride faster down a mountain, your CTA would be something like, “Ride Faster, Fall Less.” (If you can’t tell, I know nothing about mountain biking).
Goal: Sell a product or generate leads for a new service
CTA: Headline or benefit of your new blog post
If you are using Instagram to directly sell products or services, you’ll still need to be posting non-sales content regularly so that people actually want to follow you. Who would want to follow an account who is constantly promoting their own products or services? Provide value to your audience to build equity with them and make a purchase more likely when you mix in your promos.
For selling products, running sales on Instagram is a great way to drive visitors to your store. Offer an Instagram-exclusive coupon code or flash sale. This will make your followers feel like they are getting a special deal (and they are) for being part of your Instagram audience.
Goal: Increase engagement
CTA: Like this/Comment below with
Increasing your engagement on Instagram will help build that relationship with your audience so that when the time comes for a bigger ask (visit our blog post, or give us your email address for something). Psychologically, you will also have gotten them comfortable with interacting with you at a lower commitment level.
This Call To Action is usually something where there’s a photo and text. For instance, if you were a bakery you could post a picture of a delicious cake and say “Like this photo if you have a sweet tooth.” Or post a picture of several cakes or pastries in your display and ask them to comment with their favorite.
Liking is a more common and more effortless action, so getting comments might not start happening for you right away. You’ll need to have an active following to start seeing comments.
The Instagram Engagement Scale
While we’re on the subject of effort and engagement, let’s go through the levels of engagement from easiest to most difficult. It’s not a coincidence that the easiest for a person to do is also the easiest for you to get as a brand.
Instagram Engagement From Easiest To Most Difficult
- Like
- Comment/Tag A Friend
- Click the link in the bio
- Fill out a form on your site (after they click the link)
- Spend money on your site (after they click the link)
Creating Your Text Graphics For Instagram
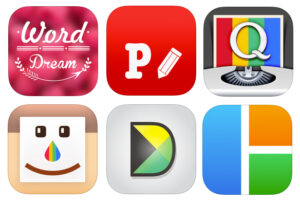 If you’re going to be creating graphics in addition to posting pictures (or more primarily than posting pictures, depending on your business and your strategy), then there are some great, simple tools available for non-designers.
On the computer, Canva is the go-to option. They have preset layouts that you can use for free and edit very quickly. After you save the image from Canva, you can email it to yourself or use a cloud storage service (iCloud, Dropbox, Google Drive, etc.) to get the image to your phone for uploading to Instagram.
If you want to stick to your phone, some popular apps are WordDream, Phonto, or InstaQuote.
Squareready is another app that you’ll find useful. This app will fit images that are not square into a square without cropping them so you don’t lose anything vital.
Pic Stitch and Diptic are both apps that will let you make photo collages. Instagram also came out with its own app to do this which is worth checking out as well.
Posting To Instagram
Ok, so you have your profile set up and your images prepped, it’s finally time to start posting to Instagram!
When you post your picture, you have several different pieces to take advantage of:
- Location
- Caption
- Emojis
- Tags
- Hashtags
- Tagging in the pic
Using The Location Option
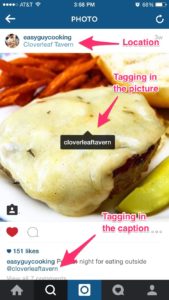 The location option is more than just so that you can post your photo and tell people where you are, but also a way for you to get found by other people looking at pictures at that location. If you’re a brick and mortar business, this will come in handy more often.
If you are posting pictures of doing work at different locations or from different locations, then this is a way for more people to find your photos.
Let’s say you don’t have a location to post from (you’re just in your office or your home or something), then the location option is a way for you to get a little headline in above your photo!
It’s popular practice to put your website address here (eg: TresnicMedia.com).
You can also use it as an actual headline to your picture.
Caption
Here’s the meat of your posts. Your Instagram caption is where you can really dive deep into delivering value for your followers. There’s no limit to how much you write in your caption, some people even write hundreds of words! It’s not about the length, it’s about the value. If you have valuable information to provide, don’t be shy about it (but do be concise).
The more value you can offer, the more people will want to follow you, engage with your posts, and take further action when you give them an action to take (your CTA posts).
Your caption is also a place where you can mention people by using their @username and add in hashtags for your posts (more on Instagram hashtags later).
Mentioning someone’s username like this is good for giving credit to someone for something in your post (if you’re quoting them, reposting them, or were inspired by them and made your own version of something they did) or if they are in the picture.
You can also mention them in your caption if you want to draw their attention specifically, but you need to have a very good reason to do this and not be intrusive. If it’s part of a continued conversation that you’re having with that person, it can make sense. But don’t just go mentioning a bunch of people so that they get notified about your new post for your own selfish reasons.
Emojis
Emojis are those cute, interesting, and random little cartoon characters you see people using. While they used to be a staple of the tween girl, they’ve now grown into a way that a majority of people communicate now via digital channels (texting, emailing, social media).
Just like we discussed about using emojis in your bio, using emojis in your posts should have the same rules. It’s up to you to determine if it makes sense for your brand to be using emojis to communicate with your audience.
As silly as they may seem, don’t brush it off without putting some thought into it. If the NBA free agency was commentated by emojis, then maybe there’s a place for you to use them as well that will show off your personality and connect with your audience.
Tags/Tagging In Photos
Instagram allows you to tag people in your photos. This feature is meant for when someone is in a photo that you are posting. You can take advantage of it for the same reasons listed above for mentioning someone in your captions.
Hashtags
This topic is a biggie. Hashtags on Instagram are a way to categorize what you’re posting about so that people interested in that topic can easily find it.
When you use a hashtag on Instagram, it becomes a clickable link that will bring you to a list of all posts using the same hashtag. This makes hashtags an opportunity for you to be found by people looking for posts of a particular topic.
Instagram allows you to post up to 30 hashtags. To avoid bloating your caption and filling your followers’ feeds with a block of hashtags they don’t need to see (they’re so you get found by new people, not people scrolling through their feed) you can add your hashtags as a comment. So post your photo with your caption, then write a comment below your caption with all of your hashtags.
My trick is to write out the hashtags in my caption and cut them out before publishing so I can quickly and easily get the comment in before any followers comment.
Now the hashtags will be truncated in the feed as if they were a regular, long comment. And when you have a few comments, they won’t appear at all (but will still be there).
Getting Followers
- They Need To Know You Exist
- They Need To See Value In Following You
Tell Them You Exist
For people to know you exist, you need them to either find you or trigger a notification for them that you’ll show up in.
Hashtags are the easiest way to help your target audience find you. I won’t go into this again as we discussed it already in the above hashtags section.
The other way to let your audience know you exist is to trigger a notification for them. Following, Liking, Commenting, and Tagging are the ways to trigger a notification and draw attention to your profile.
Following, Liking, and Commenting are pretty straight forward. Look for people who follow your competitors and your peers and then do these things. When you comment, make it something of value. The cost of doing business here is providing value. Don’t just go around spamming people’s accounts because you want them to follow you. That’s an easy way to get flagged as a spammer.
Tagging is a little different, though.
As we discussed earlier, you don’t want to Tag someone on Instagram unless you’re referencing them or they’re in a picture you post. So how can you leverage the tagging feature on Instagram to help get more followers?
You guessed it. The Call To Action posts 🙂 Once you build a following with the other tactics and earn equity in your relationship with your followers, you can start using the Call To Action posts to ask people to Tag Someone Who ____ (would also like following our account).
Show Them Value
Once they look at your profile, your Picture, Bio, and Posts will be what convince them to follow you.
This is why having your plan in place and posting before you start building your followers is so important.
If you have a brand new account, I would suggest posting 6 pictures before you start going out and Liking, Following, and Commenting to get followers. Since Instagram shows pictures in a 3 column grid, this will give you two rows of pictures. People will get to see what kind of stuff you’ll be posting and why they should follow you.
Get Started With Your Business Instagram Marketing!
Now you know how to use Instagram for business and what you need to do to get started and grow your Instagram followers!
The real knowledge will seep in when you roll up your sleeves and start doing the work. Get a feel for what’s being done in your niche and how your target audience uses Instagram and engages with other brands.
You don’t need to reinvent the wheel, just get started and keep improving based on what works for you and try things that are working for other brands like yours (or steal ideas from successful companies in other industries!).
Download Your Free Guide: How To Use Instagram For Business
 Get a PDF version of this page so you can continue to read through and even print it out to keep by your desk while you work on your Instagram skills!
