WordPress 3.X makes setting up a photo gallery in a post or a page extremely easy.
*It’s the same process to add a WordPress photo gallery to either a post or a page, so I’ll use the word post here, but just know that it really means both.
Step 1: Upload Images To WordPress Post

Create a new post or go to a post that you want to add the gallery to. Click on the upload media icon above the TinyMCE Editor and either drag and drop the group of images you want to upload into your photo gallery or select the file browser and choose them to upload.
*You can go through each photos options as you normally would to add in Title Text, Alt Text, Link URL, etc.
Step 2: Save All Changes
At the bottom of the list of the newly uploaded photos, there will be a button to Save All Changes, just click on that and the pop up dialog box will disappear.
Step 3: Click The Media Icon Again And Insert Your Photo Gallery

Click on the media upload icon again and now you will see a fourth tab option, “Gallery”, along with the default “From Computer” “From URL” and “Media Library”.
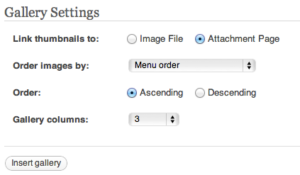
Click on the Gallery tab to see the list of photos that have been uploaded to this post. Below the list of photos, you’ll see “Gallery Settings”. Here it gives you a few options for where the photos should link, what order the photos should appear in, how the photos should be ordered, and how many photos should be in a row horizontally (Gallery Columns).
These options are all up to you. I’d suggest for the Gallery Columns option, you choose a number that can evenly divide the number of photos you uploaded. Meaning that if you uploaded 15 photos, you could have a Gallery Column of 3 or 5 so that the same amount of photos are in each row. If you chose 2 for instance, there would be one lonely photo in the last row.
Step 4: Insert Gallery
 As simple as the headline reads, just click the Insert Gallery button and you’re all done. Publish your post and you now have a beautiful WordPress photo gallery on one of your articles.
Thank You To The WordPress Team!
While this feature may seem simple to those of you who are newer to WordPress, it is a great relief compared to using different plugins in the past to create a simple photo gallery for a WordPress site. Along with the easy to set up menu system, it’s a simple task that can be taken for granted if you forget about how it used to have to be done.
